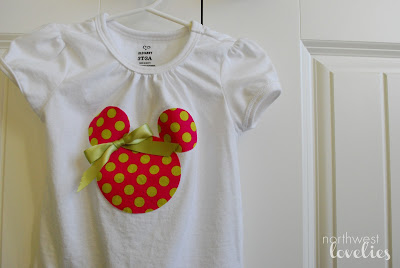
For us, no trip to Disney is complete without adorable homemade Minnie t-shirts. :) Last year, I purchased two Minnie head iron-on decals from an Etsy shop, sewed on a bow, and the shirts were adorable! This year I knew I had to learn how to use my new Silhouette Cameo and make them myself! I was hesitant to do it, so much so that I actually looked up the Etsy shop I bought the decals from last year! The shop doesn't exist anymore, so I took that as a sign that it was time to conquer the Silhouette.

Unfortunately I didn't take any pictures of the process because I did most of this project the night before we left!
- I used plain white t-shirts from Old Navy. I love their shirts because of the cute girly details, but the ruching at the neck does make it hard to iron on the decal. I had to stretch it over the end of the ironing board which worked fine.
- The fabrics I used are Michael Miller Ta Dot in Lagoon and Raspberry.
- To create the decal, I used Heat 'n Bond Ultra and adhered it to a square of fabric according to the package directions.
- In Silhouette Studio I actually designed the head myself just using the circle tool. I put two on the page so I could cut them out together.
- I placed both pieces of fabric with the Heat 'n Bond attached on my cutting mat. I set the blade to a 7 and had it double cut. I think the speed was a 2 or 3.
- Once they were cut, I peeled the finished heads off the mat and ironed them onto the shirts! I sewed a bow to each shirt and used clear nail polish to seal the ends.


Linking up to...


Unfortunately I didn't take any pictures of the process because I did most of this project the night before we left!
- I used plain white t-shirts from Old Navy. I love their shirts because of the cute girly details, but the ruching at the neck does make it hard to iron on the decal. I had to stretch it over the end of the ironing board which worked fine.
- The fabrics I used are Michael Miller Ta Dot in Lagoon and Raspberry.
- To create the decal, I used Heat 'n Bond Ultra and adhered it to a square of fabric according to the package directions.
- In Silhouette Studio I actually designed the head myself just using the circle tool. I put two on the page so I could cut them out together.
- I placed both pieces of fabric with the Heat 'n Bond attached on my cutting mat. I set the blade to a 7 and had it double cut. I think the speed was a 2 or 3.
- Once they were cut, I peeled the finished heads off the mat and ironed them onto the shirts! I sewed a bow to each shirt and used clear nail polish to seal the ends.
I'm not practiced enough with my sewing maching to sew around the decals, which is why I used Heat 'n Bond Ultra. :) These actually wash really well though and still look pretty cute! After the decals were made this project only took a few minutes per shirt. I almost made two more in different colors, but realized I already had far more outfits for the girls than days in our trip!
Linking up to...